Fuel pump relays can cause intermittent problems such as hard starting and power loss. The first check is to listen each time you turn the ignition key, you should always hear the electric fuel pump run (a whirling noise) for a few seconds as the pump pressurizes the fuel system. After the fuel pump pressurizes the system, it shuts off. If sometimes you do not hear it and have a hard or no start problem check the fuel pump relay as described below.
See what pin type you have. Generally 4 or 5 pins.
If four pins, remove relay and bench test as follows:
Using an ohm meter, check between pins 85 and 86. If reading is more or less than 85 ohms replace the unit.
If five pin type, remove relay and bench test as follows:
Using an ohm meter, check between pins 85 and 86. If reading is more than 120 or less than 40 ohms replace the unit. Check between pins 85 and pins 30 and 87, if less than 10,000 ohms replace the unit.
If the relay shows burning or distortion from heat, replace the unit and check the plug for damage. If the relay checks good, proceed to a fuel pressure and volume test.
These relays are not expense and are handy for many applications as they have a good amp rating.
I have grown tired of not having more info on my 91 Ranger. So here is some information you can use.
Tuesday
Friday
2.3L heater hose
It takes 5/8" standard hose, 3/8 hose for the wrap around metal line.
Tension and Idler pulley
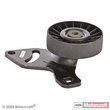
My truck with it's 2.3L engine has riveted or pressed on pulleys. They don't unbolt from the flange. The original Ford part numbers were: E97A-3F671-AA and F07A-8675-AA. I was able to find an aftermarket replacement part for them.
For E97A-3F671-AA:
http://www.rockauto.com/dbphp/x,catalog,335,partnum,36155,d,acdelco_36155.html
Pulley info: (82mm x 17mm x 31mm) - Flanged, W/10mm Bushing
This is also Napa #31655
For F07A-8675-AA (MOTORCRAFT A/C DRIVE BELT IDLER PULLEY 1990-1997 Ranger)
Alternate/OEM Part Number(s): F07A8675AA, FOTZ8678D
New Motorcraft # YS196
Napa also carries the other pulley. Gates #36153, Goodyear #49120
http://www.rockauto.com/catalog/moreinfo.php?pk=1145581
Pulley size is 90mm x N/A x 26mm
For E97A-3F671-AA:
http://www.rockauto.com/dbphp/x,catalog,335,partnum,36155,d,acdelco_36155.html
Pulley info: (82mm x 17mm x 31mm) - Flanged, W/10mm Bushing
This is also Napa #31655
For F07A-8675-AA (MOTORCRAFT A/C DRIVE BELT IDLER PULLEY 1990-1997 Ranger)
Alternate/OEM Part Number(s): F07A8675AA, FOTZ8678D
New Motorcraft # YS196
Napa also carries the other pulley. Gates #36153, Goodyear #49120
http://www.rockauto.com/catalog/moreinfo.php?pk=1145581
Pulley size is 90mm x N/A x 26mm
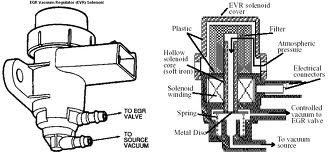
EGR control solenoid
It is located on the passenger side inner fender toward the firewall.
This is a normally closed solenoid that when energized by the ECA (electronic control assemble) it causes a vacuum to flow to the EGR valve. When it is deenergized the vacuum is stopped and the EGR valve is closed.
TESTING THE EGR SOLENOID
The resistance of each solenoid should be 68-78 ohms. If not replace the solenoid. It should flow air (vacuum) when energized. They are expected to have some small leakage when energized or not. This is normal and acceptable.
This is a normally closed solenoid that when energized by the ECA (electronic control assemble) it causes a vacuum to flow to the EGR valve. When it is deenergized the vacuum is stopped and the EGR valve is closed.
TESTING THE EGR SOLENOID
The resistance of each solenoid should be 68-78 ohms. If not replace the solenoid. It should flow air (vacuum) when energized. They are expected to have some small leakage when energized or not. This is normal and acceptable.
PCV Valve
OMG! Could they hide it any better? The pcv valve is located on the driver side of the engine. It is under the intake manifold. The pcv valve is responsible for venting crankcase vapors to the intake manifold so that they will be burned during combustion.
TESTING THE PCV VALVE
1. Remove the pcv valve from the rubber hose.
2. Shake it.
3. If it rattles freely it is good, if not or in doubt replace it. If there is a lot of "crud" in the valve, you may need to check the hose to make sure it is not plugged up with debris. If the hose is damaged or brittle, replace it
4. It's a good idea to paint the hose red or white or put some color of electrical tape on the hose to ease finding it next time.
TESTING THE PCV VALVE
1. Remove the pcv valve from the rubber hose.
2. Shake it.
3. If it rattles freely it is good, if not or in doubt replace it. If there is a lot of "crud" in the valve, you may need to check the hose to make sure it is not plugged up with debris. If the hose is damaged or brittle, replace it
4. It's a good idea to paint the hose red or white or put some color of electrical tape on the hose to ease finding it next time.
Checking your EGR valve
TESTING YOUR EGR VALVE
1. Make certain that all vacuum hoses or correctly routed and securely attached. Replace cut, cracked, crimped, melted/burnt or broken hoses.
2. Make certain there's no vacuum to the EGR valve at idle with the engine at normal operating temperature.
3. Install a tachometer.
4. Disconnected the idle bypass valve electrical connector.
5. Remove the vacuum supply hose from the EGR valve nipple and plug the hose.
6. With the transmission in neutral, start the engine and observe the engine idle speed, if necessary, adjust the idle speed to the emission decal specifications.
7. Using a hand vac pump, slowly pump up like 5 to 10 inches of mercury vacuum to the EGR valve vacuum nipple.
8. If any of the following occur replace the valve: engine does not stall; idle speed does not drop more than 100 rpm; idle speed does not return to normal plus or minus 25 rpm after the vacuum is removed.
9. Reconnect the idle bypass valve electrical connector. Unplug and reconnect the EGR valve vacuum supply hose.
There are two types of position sensors for the EGR valve. This also determines the correct EGR name, either PFE or DPFE (see below). Look at the sensor that is mounted to the EGR valve itself. Physically, the PFE sensor has one pressure input nipple. The DPFE sensor has two pressure input nipples. Electrically, both the PFE and the DPFE sensors are three wire sensors. Each have a 5-volt reference from the ECM, a ground, and a sensor output. It is in the sensor output voltage where these two sensors differ.
The EVP came in two versions: one black and the other white (off gray). These units have different values even though they mount and look the same. Make sure you have the right one.
1. Make certain that all vacuum hoses or correctly routed and securely attached. Replace cut, cracked, crimped, melted/burnt or broken hoses.
2. Make certain there's no vacuum to the EGR valve at idle with the engine at normal operating temperature.
3. Install a tachometer.
4. Disconnected the idle bypass valve electrical connector.
5. Remove the vacuum supply hose from the EGR valve nipple and plug the hose.
6. With the transmission in neutral, start the engine and observe the engine idle speed, if necessary, adjust the idle speed to the emission decal specifications.
7. Using a hand vac pump, slowly pump up like 5 to 10 inches of mercury vacuum to the EGR valve vacuum nipple.
8. If any of the following occur replace the valve: engine does not stall; idle speed does not drop more than 100 rpm; idle speed does not return to normal plus or minus 25 rpm after the vacuum is removed.
9. Reconnect the idle bypass valve electrical connector. Unplug and reconnect the EGR valve vacuum supply hose.
There are two types of position sensors for the EGR valve. This also determines the correct EGR name, either PFE or DPFE (see below). Look at the sensor that is mounted to the EGR valve itself. Physically, the PFE sensor has one pressure input nipple. The DPFE sensor has two pressure input nipples. Electrically, both the PFE and the DPFE sensors are three wire sensors. Each have a 5-volt reference from the ECM, a ground, and a sensor output. It is in the sensor output voltage where these two sensors differ.
The EVP came in two versions: one black and the other white (off gray). These units have different values even though they mount and look the same. Make sure you have the right one.
Monday
Ranger Coil Pack
Original part # E9TF-12029-AA
FD487 - Standard Motor 5C1117 - AIRTEX / WELLS |
|---|
This same coil is also found on a Mazda 626.
Also on these vehicles:
FORD TRUCK 89-99
LINCOLN 91-97
MAZDA 94-97
FORD MERCURY 91-99
If your looking for some extra kick, try the MSN coil packs #PN-8241 listed for 95-04 Fords (Mustangs).
Subscribe to:
Posts (Atom)